
How to make a board that will surf hard.
If you’ve been doing this for a while, you might not find anything new here. We all know what makes good surfboards, and the tricks we’ve been using for years. But in case you’re new to this and wondering how to make a board that will surf as hard as boards from Da Hui, Martin Mulligan or Scott Bass … well, then here are some things to keep in mind.
Find a suitable board to model your board after.
Find a suitable board to model your board after.
The first step is to find a suitable board to model your board after. You need to make sure that the board you’re modeling has the same type of graphics chipset as your existing board; if it doesn’t, you’ll have to edit the drivers and make them work with your new motherboard.
Once you’ve found a suitable model, download it and extract it somewhere safe on your hard drive. Make sure you’ve got all the necessary drivers available, too – even if they aren’t required by your existing system, they may be required by the new one.
Run the Setup program for the new motherboard.
Once you’ve got everything downloaded and extracted, run the setup program for your new motherboard (see Resources). This will automatically detect any hardware changes and install all necessary drivers for those devices. If there are any problems during this process, consult the manufacturer’s website for instructions on how to fix them.
Once this has finished installing, reboot into Windows so that Windows can check for any further updates from Microsoft and install them automatically if needed – this may take several minutes depending on how many updates there are available at any given time
Decide on the shape of your surfboard.
Decide on the shape of your surfboard.
Shapes can vary from long and thin to short and fat. The length of your board will affect how you ride it and how far you can paddle out to catch waves. Longer boards are faster, but they require more energy to paddle out to deeper water. Shorter boards are slower, but they’re easier to carry around, especially if you’re going by yourself.
Experienced surfers typically prefer longer boards that allow them more control over their rides. Beginners generally start with shorter boards because they’re easier to handle in shallow waters, where most people learn how to surf. If you’re just starting out as a surfer, try renting a board from a local shop; most will have plenty of different shapes available for rent so that you can find the one that works best for you
Get the materials you need for your surfboard.
If you’re going to make a surfboard, first you need some materials. The first thing is to get your hands on a blank — that’s the raw material of your surfboard. You can buy blanks online or at your local surf shop.
The most common type of blank for beginners is made from polyester foam and fiberglass. It’s strong enough to stand up to the rigors of learning how to surf, but light enough so that you can carry it around without getting tired.
You’ll also need some epoxy resin and fiberglass cloth. Epoxy resin is an adhesive used to hold the fiberglass in place. Fiberglass cloth is woven fabric that serves as reinforcement for your board when you’re finished building it.
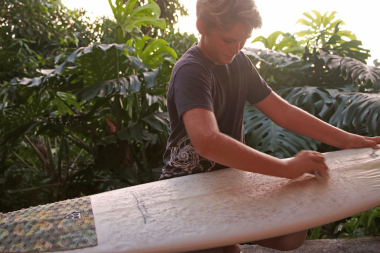
Shape and cut your blank.
Shape and cut your blank.
Now you have the blank to work with, so it’s time to start shaping it into the final product. You’ll use a few different tools for this part of the process, including a file, rasp, and sandpaper.
To begin, you’ll want to make sure your blank is rounder rather than flatter. If it’s too flat, you won’t be able to do much with it once you’re done shaping it. Then use your file to remove any excess wood from the top of your blank where you want the headstock to go. The headstock should be perfectly shaped before doing anything else to it.
Once this is done, you can begin working on the neck itself by cutting off excess material from either side of the headstock using a saw or other tool that can cut through wood easily like an axe or hatchet (be careful not to damage yourself!). When cutting off excess material from one side of your neck, be sure that you don’t cut off too much as this will affect how long your guitar will be when finished playing! You may also want to consider adding in some decorative features like grooves or patterns around this area if you’re feeling ambitious – just remember not to make them too.
Reinforce the rails of your surfboard.
Reinforcing the rails of a surfboard is easy and cheap.
You can reinforce the rails of your surfboard with West Systems 105 Resin, two-part marine epoxy, and some fiberglass cloth. It’s durable and repairable, but it can also add weight to your board.
Reinforcement will help prevent dings in your rail, which will increase its durability and lifespan. You can reinforce any rail on any board — longboards, shortboards, even SUPs — as well as the tip or tail section.
The process is simple: Mix up a batch of West Systems 105 Resin (and hardener if needed), coat the area where you want to reinforce with resin and fiberglass cloth, then let it cure for at least 24 hours before using the board again.
Drill holes in the bottom of your surfboard.
Drill holes in the bottom of your surfboard.
Drilling holes in your surfboard is one of the most common techniques used to customize a board and make it more responsive. Holes drilled into the center of the board will allow water to pass through, creating less pressure on the rails and allowing you to turn quickly and drive your rail into waves with ease. Holes drilled near the rails will create more pressure on that part of the board, keeping you stuck on rail and allowing you to maintain speed while carving into turns.
The most common type of hole to drill is one that runs along the centerline or “neutral axis” (the imaginary line running through the center of your board) from nose to tail; this is also known as a “long line” or “neutral line”. Other types of long lines include side long lines (from nose to tail on one side only), short lines (from nose to tail on both sides) and twin lines (one long line per side).
Build a temporary frame to hold your surfboard together while you glass it.
Build a temporary frame to hold your surfboard together while you glass it.
If you’re working on a large, flat surfboard, it’s helpful to build a temporary frame out of foam and plywood to hold the board together while you glass it.
Lay out the foam core in the shape of your surfboard and trace around it with a marker. Use the marker to draw a line where you want the glassing seam to be.
Measure down from the top of your foam core by half an inch, then cut down that line with a utility knife or razor blade until you reach the bottom of the board. Cut along all four sides of your foam core until it fits perfectly into your board and leaves an inch-long lip at both ends for gluing onto fiberglass later on.
Cut out two pieces of plywood that will fit inside your outline and glue them into place so that they’ll serve as supports for fiberglass later on (you can also use wood blocks). Make sure they’re slightly bigger than your outline so that they don’t interfere with how tightly you can press fiberglass down onto them later on — this will prevent air bubbles from forming under the glass during curing process which would weaken strength of finished product).


Leave a Reply